Using external secrets in CI
- Introduced in GitLab 13.4 and GitLab Runner 13.4.
Secrets represent sensitive information your CI job needs to complete work. This sensitive information can be items like API tokens, database credentials, or private keys. Secrets are sourced from your secrets provider.
Unlike CI variables, which are always presented to a job, secrets must be explicitly required by a job. Read GitLab CI/CD pipeline configuration reference for more information about the syntax.
GitLab has selected Vault by HashiCorp as the first supported provider, and KV-V2 as the first supported secrets engine.
GitLab authenticates using Vault's
JSON Web Token (JWT) authentication method, using
the JSON Web Token (CI_JOB_JWT)
introduced in GitLab 12.10.
You must configure your Vault server before you can use use Vault secrets in a CI job.
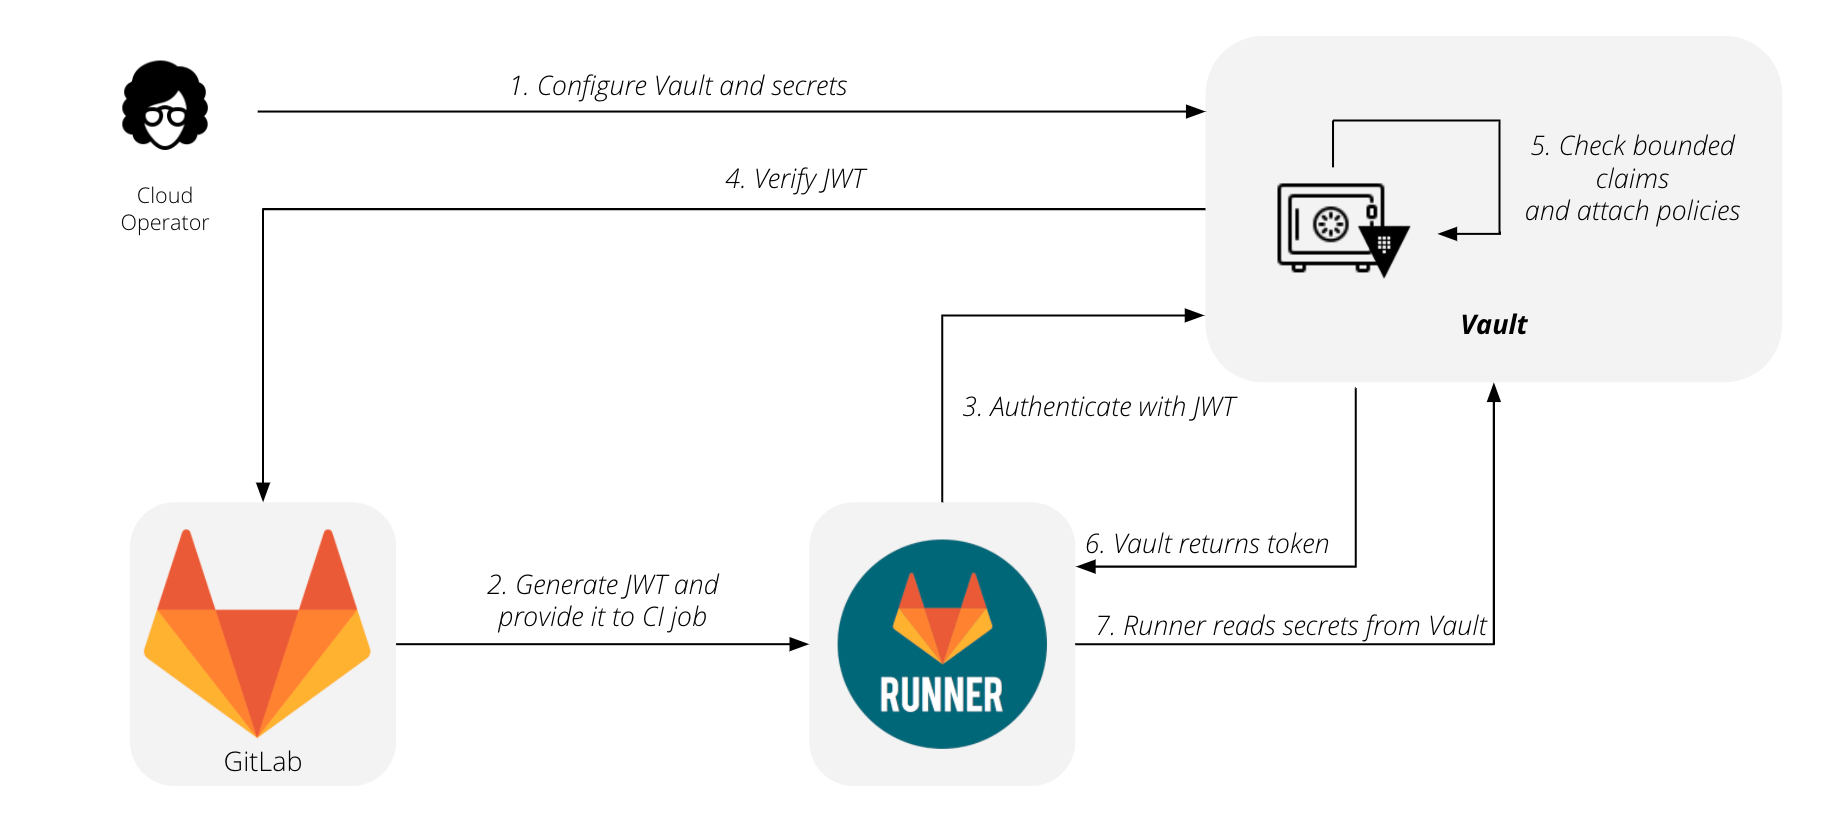
The flow for using GitLab with HashiCorp Vault is summarized by this diagram:
- Configure your vault and secrets.
- Generate your JWT and provide it to your CI job.
- Runner contacts HashiCorp Vault and authenticates using the JWT.
- HashiCorp Vault verifies the JWT.
- HashiCorp Vault checks the bounded claims and attaches policies.
- HashiCorp Vault returns the token.
- Runner reads secrets from the HashiCorp Vault.
NOTE: Read the Authenticating and Reading Secrets With HashiCorp Vault tutorial for a version of this feature. It's available to all subscription levels, supports writing secrets to and deleting secrets from Vault, and supports multiple secrets engines.
Configure your Vault server
To configure your Vault server:
-
Enable the authentication method by running these commands. They provide your Vault server the JSON Web Key Set (JWKS) endpoint for your GitLab instance, so Vault can fetch the public signing key and verify the JSON Web Token (JWT) when authenticating:
$ vault auth enable jwt $ vault write auth/jwt/config \ jwks_url="https://gitlab.example.com/-/jwks" \ bound_issuer="gitlab.example.com" -
Configure policies on your Vault server to grant or forbid access to certain paths and operations. This example grants read access to the set of secrets required by your production environment:
vault policy write myproject-production - <<EOF # Read-only permission on 'ops/data/production/*' path path "ops/data/production/*" { capabilities = [ "read" ] } EOF -
Configure roles on your Vault server, restricting roles to a project or namespace, as described in Configure Vault server roles on this page.
-
Create the following CI variables to provide details about your Vault server:
-
VAULT_SERVER_URL- The URL of your Vault server, such ashttps://vault.example.com:8200. Required. -
VAULT_AUTH_ROLE- (Optional) The role to use when attempting to authenticate. If no role is specified, Vault uses the default role specified when the authentication method was configured. -
VAULT_AUTH_PATH- (Optional) The path where the authentication method is mounted, default isjwt.
NOTE: Support for providing these values in the user interface is planned but not yet implemented.
-
Use Vault secrets in a CI job (PREMIUM)
- Introduced in GitLab Premium 13.4 and GitLab Runner 13.4.
After configuring your Vault server, you can use
the secrets stored in Vault by defining them with the vault keyword:
secrets:
  DATABASE_PASSWORD:
    vault: production/db/password@ops  # translates to secret `ops/data/production/db`, field `password`
In this example:
-
production/db- The secret. -
passwordThe field. -
ops- The path where the secrets engine is mounted.
After GitLab fetches the secret from Vault, the value is saved in a temporary file.
The path to this file is stored in environment variable named DATABASE_PASSWORD,
similar to CI variables of type file.
For more information about the supported syntax, read the
.gitlab-ci.yml reference.
Configure Vault server roles
When a CI job attempts to authenticate, it specifies a role. You can use roles to group different policies together. If authentication is successful, these policies are attached to the resulting Vault token.
Bound claims are predefined values that are matched to the JWT's claims. With bounded claims, you can restrict access to specific GitLab users, specific projects, or even jobs running for specific Git references. You can have as many bounded claims you need, but they must all match for authentication to be successful.
Combining bounded claims with GitLab features like user roles and protected branches, you can tailor these rules to fit your specific use case. In this example, authentication is allowed only for jobs running for protected tags with names matching the pattern used for production releases:
$ vault write auth/jwt/role/myproject-production - <<EOF
{
  "role_type": "jwt",
  "policies": ["myproject-production"],
  "token_explicit_max_ttl": 60,
  "user_claim": "user_email",
  "bound_claims_type": "glob",
  "bound_claims": {
    "project_id": "42",
    "ref_protected": "true",
    "ref_type": "tag",
    "ref": "auto-deploy-*"
  }
}
EOF
WARNING:
Always restrict your roles to a project or namespace by using one of the provided
claims like project_id or namespace_id. Without these restrictions, any JWT
generated by this GitLab instance may be allowed to authenticate using this role.
For a full list of CI_JOB_JWT claims, read the
How it works section of the
Authenticating and Reading Secrets With HashiCorp Vault tutorial.
You can also specify some attributes for the resulting Vault tokens, such as time-to-live, IP address range, and number of uses. The full list of options is available in Vault's documentation on creating roles for the JSON web token method.
